라우터(Router)


라우터 개념 및 동작원리
  blue00_next.gif 개념
  blue00_next.gif 동작원리


라우터 기종별 설정방법


  Cisco라우터


   blue00_next.gif 라우터의 외형 및 환경설정
   blue00_next.gif configration설정순서
   blue00_next.gif 설정상태보기
   blue00_next.gif


  ADC라우터


   blue00_next.gif 라우터의 외형
   blue00_next.gif configration설정순서
   blue00_next.gif


  쌍용라우터


   blue00_next.gif 라우터의 외형
   blue00_next.gif 라우터 설정방법
   blue00_next.gif configration 초기화방법
   blue00_next.gif 주요 조회명령어


  인텔라우터


   blue00_next.gif 라우터의 외형
   blue00_next.gif 라우터 설정방법
   blue00_next.gif


  한아라우터


   blue00_next.gif 라우터의 외형
   blue00_next.gif 라우터 설정방법
   blue00_next.gif


1.라우터의 기본개념 및 동작원리       [▲Top으로]          


라우터의 개념
라우터는 전용회선을 통해 LAN에 연결된 컴퓨터들이 동시에 인터넷을 사용할 수 있게 해주는 장비로
데이터를 목적지까지 전달이하는 기능을 수행하며 2개이상의 서로다른 네트워크를 접속하고
이들간에 데이터를 주고 받게하는 중계기능도 한다.
대부분의 라우터는 IP 라우팅 기능뿐 아니라 LAN용 프로토콜인 IPX, AppleTalk등의 브리징 기능도
함께한다.
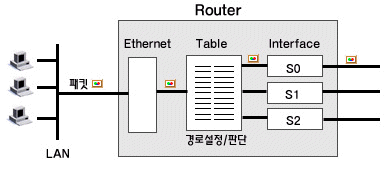

                                           <라우터 동작>

라우터의 동작원리
라우터는 패킷의 전송경로를 결정하기 위해 랜테이블, 네트워크테이블, 라우팅테이블을 사용한다.
라우터는 위의 3가지 테이블을 관리함으로써 다른 네트웍에 연결된 장치들을 비롯하여 네트웍에
연결된 모든장치들의 주소를 인식하고 이것을 바탕으로 패킷의 전송경로를 결정한다. 테이블을 가지고
라우터가 동작하는 것을 살펴보면, 같은 네트워크에 있는 장치(컴퓨터..등)로부터 패킷을 보내면
라우터에서는 먼저, 랜테이블에 검사를 한다 .이곳에서는 패킷의 목적지가 같은 네트워크에 있는지
아니면 다른 네트워크에 있는지를 확인한다. 그리고 나서 네트워크테이블을 검사하여 패킷을 전달한
네트워크주소를 찾아낸다. 그런 다음 라우팅테이블을 검색하여 가장 적합한 경로를 찾아내서 패킷을
보내게 된다.

◈ 랜테이블:
   랜테이블은 라우터에 연결되어 있는 랜 세크먼트내 장치의 주소를 관리하고 있으며 필터링작업에
   사용된다.
   
◈ 네트워크테이블:
    네트워크상의 모든 라우터의 주소를 보관하며 패킷의 수신지 라우터를 실별하는데 사용된다.

◈ 라우팅테이블:
    개개의 라우터에 구축되어 있으며 각 경로에 대한 정보를 유지하고 있어서 다른 세그먼트로 전송
    되는 패킷의 경로를 결정하는데 사용된다.

위에 있는 3개의 테이블은 라우터가 패킷을 전송함에 있어서 최선의 경로를 선택하게 하고 회선의
장애나 라우터의 장애시 우회 경로를 선택해서 패킷 Routing loop를 방지하기 위해 사용된다. 이것이
라우터 동작의 핵심요소이다.

▲Top으로


2.시스코라우터 설정방법          [▲Top으로]


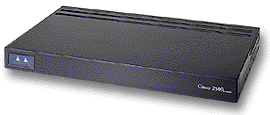
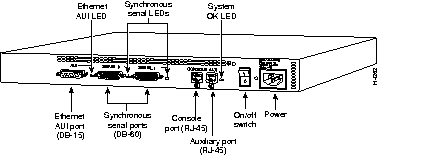
시스코라우터 외형


시스코라우터 환경설정

 시스코 Console cable pin assign 

 ROUTER(RJ45)                      PC(25pin)
     1  ----------------------  4  (RTS)
     2  ---------------------- 20 (DTR)
     3  ----------------------  2  (TXD)
     4  ----------------------  7  (S.G)
     6  ----------------------  3  (RXD)
     7  ----------------------  8  (DCD)
     8  ----------------------  5  (CTS)


 통신에뮬레이터 환경
     9600 bps, 8 data bit, 1 stop bit, parity none.

 시스코라우터 설정 특징
   Configuration Setting시 직접 Command를 입력하는 방법과 Router Power on 시
   H/W Test후 나타나는 Menu상에서 Configuration Setting 작업을 수행하는 Menu
   방식의 2가지 Mode가 제공된다.   Cisco Router의 경우 Command의 사용방법이
   매우 간결하므로, 직접 Command를 사용하여 Setting 작업을 수행하는 것이
   Menu방식에 비해 편리하므로 Command line방식 중심으로 설명코져 한다.

시스코Configration설정방법

 기본적인 설정내용
   ① serial port 지정
     - ip address 설정
     - encapsulation 지정

   ② ethernet port 지정
     - ip address 설정

   ③ routing protocol 의 지정, 필요시 static routing 설정.

라우터 설정예

  ex) 고객명 : 부산
      - router 기종 : cisco 2500
      - 접속 protocol : ppp , - 속도 : 512kbps
      - 고객측 serial ip, netmask : 210.248.102.100 / 255.255.255.252
      - 고객측 ethernet ip, netmask : 210.108.245.1 / 255.255.255.192

 시스코라우터 설정순서

pusan#config t -------- configuration terminal의 약어,  
                                     command setting mode로의 전환을 의미..

pusan(config)#
ip subnet-zero --------- ip block이 0(zero)로 시작하여 subneting
                                                            시킬 경우의 명령어

pusan(config)#
ip classless---------ip를 classless하게 사용하기 위한 명령어  
pusan(config)#
int e0  ------- ethernet port 설정을 시작한다.
pusan(config-if)#
no shutdown  ------ default 는 disable(shutdown) 상태이므로
                                                           이것을 enable 시킨다.

pusan(config-if)#
ip add 210.108.245.1 255.255.255.192 --- ethernet에 ip address를
                                                                                     지정한다.

pusan(coining-if)#
exit  ------- ethernet 설정을 마무리하고 다음 설정으로 넘어간다.
pusan(config)#
int s0  ------- serial port 설정을 시작한다.
pusan(config-if)#
no shutdown
pusan(config-if)#
ip add 210.248.102.100 255.255.255.252
pusan(config-if)#
encapsulation ppp  ------- 접속 protocol을 지정한다.(이기종간)
                                                                   cisco router끼리는 HDLC로 설정한다
.
pusan(config-if)#
bandwidth 512  ------- 접속 회선 속도를 설정한다.
pusan(config-if)#
description pusan
pusan(config-if)#
exit

pusan(config)#ip route 0.0.0.0 0.0.0.0 210.248.102.99  ------- default route를 구성한다.
pusan(config)#
ip name server 164.124.101.2  ------- domain name server를 지정한다.
pusan(config)#
^Z ------- Ctrl+Z를 눌러서 config mode를 종료한다.
pusan#
wr ------- save 한다.
####[OK]


  시스코라우터 설정상태보기

pusan# sh config    ------- show configration의 약자,
                                          configuration setting 상태의 확인.

Using 653 out of 32762 bytes
!
version 11.1 -------
현재 동작중인 router의 IOS Version을 나타낸다.
service udp-small-servers
service tcp-small-servers
!
hostname pusan -------
라우터의 이름을 나타낸다.( 접속시 prompt로 나타남.)
!
enable secret 5 $1$QZj/$NeE5rJCxLbdFUJUJ/CBcx0 -------
command mode로
                                                                                       전환되기 위한 password.

enable password router
!
!
interface Ethernet0
 ip address 203.233.10.5 255.255.255.0
!
interface Serial0
 ip address 203.252.12.10 255.255.255.252
 description pusan-woman-university
 encapsulation ppp -------
접속 protocol이 ppp임을 의미.
 bandwidth 512 -------
512K bps 의 전송속도를 의미.
!
interface Serial1
 no ip address
 shutdown  -------
관리자가 임의로 down, up 시킬 수 있으며 default는 shutdown 상태.
!
ip name-server 164.124.101.2 -------
domain-name server를 지정한다.
no ip classless
ip route 0.0.0.0 0.0.0.0 203.252.12.9 -------
default route를 지정한다.
snmp-server community public RO      
  destination은 상대 router serial port로 한다.
!
line con 0
line aux 0
line vty 0 4 -------
router에 telnet 접속을 허용하되 login의 절차를 거치고,
                             password는 router(임의 설정가능)로 한다.
                             (가상단말기 0-4까지 총5대의 접속을 허용)
password router            
login
!
end


 좀더 자세한 정보를  원하시면 제조사인 시스코에서 확인 할 수 있습니다.
 
시스코2501 configration 보기

▲Top으로


3.ADC라우터(ADC-Kentrox) 설정방법         [▲Top으로]


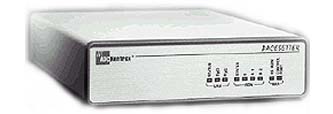
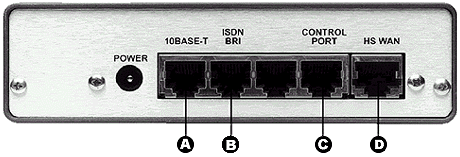
ADC라우터 외형


ADC라우터 Setting법

설정을 위한 준비사항

Router Console이 사용 가능한 Pc의 Com1혹은 Com2 Port에 연결한다.
Terminal Software(예를 들면 Windows95에서 하이퍼 터미날 등)을 실행한다.
 
기본적인 Terminal Setup을 맞춘다.  
 - Com1(
혹은 Com2)에 직접연결
 -
속도: 9600
 -
나머지 내용은 Default Setting을 그대로 이용하면 된다.
Termial Type을 Vt100으로 설정한다.설정 안할 시 접속 불가능

Router의 전원을 켠다.
Terminal
에서 Router가 부팅되는 과정을 볼 수 있다.
그 다음 과정부터는 Router에서 나오는 내용대로 타이핑만 하면 된다.


처음
접속을 시작하면 Password를 물어 본다. 기본설정으로 된 Password는 secret 로 접속된다.

ADC Kentrox PACESETTER Pro V35U
 Software Version Number 6.4
 Serial Number 00924107
 Copyright (C) 1990-1997
Press ESC to exit control port

To get back into control port, type 9999 <RET>

         Enter password : secret

Hyper Terminal에서 설정한 Terminal types를 Vt100으로 설정하여야만 접속가능,
Terminal Type
에서 2번을 설정한다.

 Control Port Terminal Types
  1 - Wyse 50 or TVI-910/920
  
  2 - VT100 or ANSI compatible

   Enter Terminal Type: 2


첫 번째로 보는 Main Menu화면에서  Configuration 3번을 선택한다.

**Main Menu**                                  PACESETTER Pro V35U Control Port

 1 - Status                     Board, addresses, statistics, enable/disable, error log
 2 - Call control             Call set-up, disconnect, status
 3 - Configuration          Dial directory, port, and application parameters
 4 - System functions    Date/time, applications, load software, restart
 5 - Security                  Control port passwords, PAP/CHAP, IP filters, RADIUS

                                     Enter command number: 3

Terminate input with <RET>                                   Press ESC to exit


Configuration commands 화면에서  Port  2를 선택한다.

**Configuration Commands**                     PACESETTER Pro V35U Control Port

 1 - PPP dial directory        Locations, telephone numbers, option selection
 2 - Port                              Protocol, connection mode, line speed, addresses
 3 - Router                           IPX & IP addresses, static routes
 4 - Bridge                           STP & Bridge filters
 5 - Frame Relay                  DLCIs for routing/bridging
 6 - Async services              PAD & Telnet parameters
 7 - System parameters        Heralds, idle timers, DNS, etc.
 8 - SNMP                           Community strings, trap addresses, authentication
 9 - Bandwidth on demand    ISDN port utilization parameters
10 - X.25                             X.121 addresses, switching table

                                            Enter command number: 2

Terminate input with <RET>               Press ESC to return to previous menu


Configure Port화면에서  HS WAN Port  5번을 선택한다.

**Configure Port**                             PACESETTER Pro V35U Control Port

Valid port numbers (with names) are:

 0: Ethernet
 2: D Channel
 3: B Channel
 4: B Channel
 5: HS WAN
 6: Control Port

                                  Enter port number: 5

Terminate input with <RET>               Press ESC to return to previous menu


PPP Port Configuration화면에서  WAN Port에 대한 값을 설정한다.

**PPP Port Configuration**                     PACESETTER Pro V35U Control Port

Port 5   SC-35                               

|- Press <RET> to toggle values -| |- Type in values.  Max chars shown in () -|
  
Port type:   PPP        기본값                        Port name:     HS WAN   기본값   
  
Connection mode:   LEASED (DTE) 기본값

   Line speed:        56.0 KBPS            알맞은 전용선의 속도를 조정한다.
  
Compression:        N                     압축 옵션은 필요에 따라 선택적으로 선택한다.
  
Circuit backup:       N

Traffic types permitted on line    Remote IP address   203.252.15.1
  IP Routing:             Y                     (IP 라우팅만 선택한다)
  IPX Routing:           N
  Ethernet Bridging:   N

                                         Process selections (Y/N): Y Y를 선택

Use TAB & CURSOR keys to move among fields    Press ESC to abort command & exit


다시
Main Menu화면에 가서  Configuration 3번을 선택한다.

**Main Menu**                                  PACESETTER Pro V35U Control Port

 1 - Status                  Board, addresses, statistics, enable/disable, error log
 2 - Call control           Call set-up, disconnect, status
 3 - Configuration        Dial directory, port, and application parameters
 4 - System functions  Date/time, applications, load software, restart
 5 - Security                Control port passwords, PAP/CHAP, IP filters, RADIUS

                                    Enter command number: 3

Terminate input with <RET>                                   Press ESC to exit


Configuration Commands 화면에서  Router 3번을 선택한다.

**Configuration Commands**                     PACESETTER Pro V35U Control Port

 1 - PPP dial directory           Locations, telephone numbers, option selection
 2 - Port                                Protocol, connection mode, line speed, addresses
 3 - Router                             IPX & IP addresses, static routes
 4 - Bridge                             STP & Bridge filters
 5 - Frame Relay                    DLCIs for routing/bridging
 6 - Async services                PAD & Telnet parameters
 7 - System parameters          Heralds, idle timers, DNS, etc.
 8 - SNMP                             Community strings, trap addresses, authentication
 9 - Bandwidth on demand      ISDN port utilization parameters
10 - X.25                               X.121 addresses, switching table

                                              Enter command number: 3

Terminate input with <RET>               Press ESC to return to previous menu

 
Router Commands 화면에서  IP Port Information 5번을 선택한다.

**Router Commands**                PACESETTER Pro V35U Control Port

             IPX Router                                     IP Router

         1 - IPX port information                 5 - IP port information
         2 - IPX RIP & SAP settings            6 - IP static routes
         3 - IPX RIP static routes               7 - IP security features
         4 - IPX static services                  8 - IP DHCP server
                                                             9 - IPshare static mapping
                                                           10 - IP NAT proxy servers

                                      Enter command number: 5

Terminate input with <RET>               Press ESC to return to previous menu

 
IP Port lnformation화면에서  Ethernet Port에  할당 받은 IP중 하나를  할당하고 WAN Port에는
  ISP에서 지정 받은 Serial IP를 적어 주고 Mask도 설정해 준다. Protocol은 NONE선택한다.

**IP Port Information**                        PACESETTER Pro V35U Control Port

Port   Interface    IP Address        IP Mask       |-Use RET to toggle values-|

                                x.x.x.x         x.x.x.x             Protocol     Encapsulation
  0    ETHERNET     210.108.1.1     255.255.255.128    NONE            ENET II
  3    PPP                   0.0.0.0         0.0.0.0               NONE
  4    PPP                   0.0.0.0         0.0.0.0               NONE
  5    PPP               203.252.15.2   255.255.255.252    NONE
Note: x = 0-255

                                            Process selections (Y/N): Y Y를 선택

Use TAB & CURSOR keys to move among fields   Press ESC to abort command & exit

 
Router Commands 화면에서 IP static routers 6번을 선택한다.

**Router Commands**                            PACESETTER Pro V35U Control Port

                IPX Router                            IP Router

         1 - IPX port information                5 - IP port information
         2 - IPX RIP & SAP settings           6 - IP static routes
         3 - IPX RIP static routes              7 - IP security features
         4 - IPX static services                 8 - IP DHCP server
                                                            9 - IPshare static mapping
                                                          10 - IP NAT proxy servers

                                      Enter command number: 6

Terminate input with <RET>               Press ESC to return to previous menu


IP Static Router 화면에서  Static Routes로 선택할 IP (ISP Serial)를 Next Hop에 적어 준다.
  
설정한 후 Ctrl+Enter를 누르면 커서가 120번에 와서 멈춘 다음 끝부분에서 Y를 선택한다.

**IP Static Routes**                           PACESETTER Pro V35U Control Port

Destination IP Network   IP Mask             Next Hop               Hops

     x.x.x.x                        x.x.x.x             x.x.x.x                   (1 - 15)
 1: 0.0.0.0                         0.0.0.0             203.252.15.1              1
 2:

Note: x = 0-255

                                              Process Static Routes (Y/N): Y Y를 선택

In IP address field, use UP/DOWN to scroll and LEFT to process selections.
To change or add entry, enter new value
     
Use <CTRL-D> to delete entry Use TAB & CURSOR keys to move among fields  
Press ESC to abort command & exit


▲Top으로

4.쌍용라우터(SR2501) 설정방법        [▲Top으로]


쌍용라우터 외형


설정방법 및 주요 명령어

 통신에뮬레이터 환경
     9600 bps, 8 data bit, 1 stop bit, parity none.

 쌍용라우터 설정 방법

SR2501>admin 
password : sr2501                               (default password)
SR2501#  wanset speed 1 256000         wan port의 speed setting
                                                       
  (1=port No, 256000=speed)

SR2501#  wanset enable 1                   wan port 1번 enable명령

SR2501#  lanset enable 0                     enthernet port 0번 enable명령

SR2501#  ip                                        ip add를 입력하기전에  ip방으로 들어간다

SR2501#IP#  enable                            ip add를 입력하기전에 ip process enable
                                                        (ip disable = ip process disable)

SR2501#IP#  int cr 210.107.121.65 255.255.255.252 1 bc  
                                  
 
wan port 1번의 ip add 생성하고 broadcast network
                                      -bc: broadcast network
                                     -nb:non-bc
                                     -pp:p-t-p network

                                         
  wan port의경우 encapsulation ppp가 default임.

SR2501#IP#  int en 210.107.121.65 1       wan  port 1번의 ip add enable  

SR2501#IP#  int cr 203.252.12.18 255.255.255.192 0 bc  
                                 
ethernet port의  ip add를 생성하고 broadcasting

SR2501#IP#  int en 203.252.12.18 0   
                                     
  
ethernet port 1번의 ip add enable 

SR2501#IP#  static add 0.0.0.0 0.0.0.0 128 1 <next HOP IP>   
               
                        
default route setup-next HOP은 데이콤측 시리얼ip이다.
                                        preference(128):라우팅되는 우선 순위
                                        metric (1):정적경로(static)의 값,
                                                       
복수개의 경로에 대해  경로결정

SR2501#IP#   ip save                    ip 저장명령

SR2501#IP#   end                         상위메뉴로 빠져나옴.

SR2501#   saveall                          mainmemory 저장

SR2501#  write                              NVROM(flash memory)에 입력

참조사항 : OUT PUT Drop이 발생할 경우(게임방에만 적용되는 사항)

SR2501#  wanset txsize 1 s            게임방같은 low-volume data가 폭주하는 곳에
                                                      s(small queue) 적용

SR2501#  reset                               output queue가  24개에서 261개로 증가
                                                    - output drop
을 막을수 있슴.


쌍용Configration 초기화방법  

SR2501>admin
password : sr2501

SR2501#   default                                공장출하시 설정값으로 setting
SR2501#   write
SR2501#   reset


 쌍용라우터
주요 조회명령어

SR2501#  ip sh int               라우터의 serial 및 ethernet에 입력되어진 ip add를 확인

SR2501#  ip sh route                            라우터의 라우팅정보를 확인

SR2501#  ip sh ip                                  ip process의 전체상태

SR2501#  ip sh int                                 interface정보

SR2501#  ip sh nexthop

SR2501#  ip sh local(or remote)            경로검색

SR2501#  ppp sh ppp
     
serial port의 라우팅이 정상적으로 작동하는 지를 확인  (LCP,IPCP가 OPEN =정상)

SR2501#  ppp sh lcp

SR2501#  ppp sh port 1 
    
display data하단에 BadAddr(0),BadControl(0),TooLong(0)  ()값이 ‘0’은 정상

SR2501#  sh conf                                  config상황 확인

SR2501#  sh int 0,1,2                              port별 interface상황 확인

SR2501#  sh protocol

SR2501#  sh memory

SR2501#  ping <ipadd> [size (no)]        default:size=56,no=10

SR2501#  telnet                                     sr2501은 telnet 및 trace기능이 없슴


 기타 자세한 설정사항은 라우터 제조사인 쌍용정보통신에서 확인할 수 있습니다. 
   
쌍용정보통신 매뉴얼보기로 바로가기

▲Top으로


5.Intel라우터(9100-9400) 설정방법       [▲Top으로] 


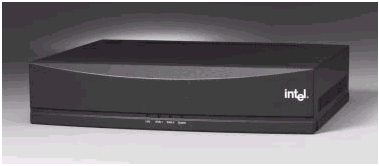
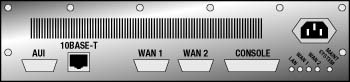
인텔라우터 외형
 

전면부

후면부


인텔라우터 설정법

 접속환경 : 하이퍼터미널,통신프로그램 이용 라우터 콘솔 port 와 pc comm port간 콘솔케이블 연결후
                   환경설정[속도(9600bps), 데이터(8bit),패리티(none),정지(1bit)로 설정]

 설정순서(인터넷 접속기준)

 1.admin접속화면

210.92.170.129   0000800E1908                       Diag-Err          18:57:47
<login>


(c) Intel Corporation, ER9201W Express Router 9201
     Version 2.30    

<Administrator...    >  Configuration and monitoring

   User...                    Monitoring    

   Logout     


설명) Consloe cable을 접속, 라우터 설정 초기화면에서 ↑ ↓ key를 이용
         Administrator에 커서를 이동후 엔터를 치면 설정화면 접속


 2.Configration Menu화면

210.92.170.129   0000800E1908                       Diag-Err          18:57:47
<login>

Local Management

 <Configuration...    >    Router configuration, save and load  

   Troubleshooting         Current problems with diagnostics

   Monitoring...              Router, port, link and protocol monitoring

   Software update...      Router software update and reset options

   Telnet                       Connect to another device

   Quit  


 설명)   Administrator으로 이동한 화면, Configration..으로 이동


 3.Cnfigration의 Configration tool접속화면

210.92.170.129   0000800E1908                       Diag-Err          18:57:47
<login>

Local Management

  Configuration                                                                 
                                                                                
   
<Configuration tool..>      Set up router using Basic or Advanced Setup          
                                                                                
    Save to FlashPROM        Save configuration as permanent configuration        
                                                                                
    Load from FlashPROM    Reset active configuration in RAM to permanent       
                                                                                
    Load factory default        Reset active configuration in RAM to defaults        
                                                                                
    Save to server                Upload active configuration from RAM to TFTP server  
                                                                                
    Load from server             Download configuration from TFTP Server to RAM       
                                                                                
    Configuration status        Configuration status                                 
                                                                                
    Clock                              Set the internal clock    

    Quit  


설명)   Administrator/Configration/Configration Tool화면 으로 이동 


 4.Configration Tool화면

210.92.170.129   0000800E1908                       Diag-Err          18:57:47
<login>

                                                                                                
    Name        :                                                               
    MAC Address : 0000800E1908    IP : 210.92.170.129                           
                                                                                                
                                                                                
    Basic...                Select Basic to let the Configuration Wizard guide        
                               you through the mandatory configuration to get the        
                               router up and running as easily as possible.              
                                                                                
   
<Advanced...>      Select Advanced to access additional features,            
                               facilities and operating parameters used for the          
                               router.                                                   
                                                                                
    Exit...                   Exit the configuration tool and use or discard            
                                configuration changes.      


설명)   Administrator/Configration/Configration Tool/Advanced 화면 으로 이동

 
 5.Advanced Menu화면 

210.92.170.129   0000800E1908                       Diag-Err          18:57:47
<login>

   
  Express Router 9201                                                                  
  Advanced                                                                                    
                                                                                              
    Name        :                                                               
    MAC Address : 0000800E1908    IP : 210.92.170.129                           
                                                                                       
                                                                                 
    System...           System identification                                       
                                                                                
   
<Links...     >      LAN/WAN connections                                         
                                                                                
    Protocols...        Routing/bridging protocols                                  
                                                                                
    Management...   Local management                                            
                                                                                
    SNMP...             Authentications and traps lists                             


설명)   Administrator/Configration/Configration Tool/Advanced /Links 화면으로 이동 

  
 6.Links LAN/WAN link Type변경화면(포트설정화면이다)

210.92.170.129   0000800E1908                       Diag-Err          18:57:47
<login>

   
  Express Router 9201                                                           
  Links                                                                                  
                                                                                
    Link                                                                       
   
 LAN  Link                      AUI/10Base-T                    Add...     
    ISDN Link                                 WAN 1                               
    
WAN Link                                 WAN 2                    Setup...     
                                                                                
                                                                                 Delete       
                                                                                 
                                                                   Timers...    
                                                                                
      OK                         FR Ports...   X.25 Ports...   ISDN Ports...    


설명) LAN Link의 Media Type을 먼저 확인한 후 WAN Link로 커서를 이동하여 선택한 후
         우측의 Setup을 선택한다.


 7.WAN Link port paramater설정화면

210.92.170.129   0000800E1908                       Diag-Err          18:57:47
<login>


   Express Router 9201                         
   Links                                                
   
WAN Link                                          
                                                         
   Link No.                : 3                                                     
   WAN Protocol        :
PPP over HDLC__*                                      
   Link Name             : WAN Link                                              
   Status                   :
Enabled  *                                            
   Port                      :
WAN 2 *                                               
   Service Type           :
Leased  *                                             
   Data Compression   :
Disabled  *                              
   Use Encryption       :
No  *                                                 
   Encryption Key        :                                                       
   Baudrate                :
256k  *                                               
                                                                                
                                                                                     
      OK       Undo     Default                                    
Advanced...    


설명) Administrator/Configration/Configration Tool/Advanced /Links /WAN Link 화면
        안내에 따라 파라메터을 설정을 완료한후 Advanced에 선택한다.


 8.Advanced 설정화면

210.92.170.129   0000800E1908                       Diag-Err          18:57:47
<login>

        
  Express Router 9201                                                           
  Advanced                                                                      
                                                                                           
    Name        :                                                               
    MAC Address : 0000800E1908    IP : 210.92.170.129                           
                                                                                                
                                                                                
    System...         System identification                                       
                                                                                
    Links...             LAN/WAN connections                                         
                                                                                
  
 <Protocols... >  Routing/bridging protocols                                  
                                                                                
    Management...  Local management                                            
                                                                                
    SNMP...            Authentications and traps lists                             
   
      OK                                                           


설명) Administrator/Configration/Configration Tool/Advanced /Protocol 선택후 이동


 9.Protocol 설정화면

210.92.170.129   0000800E1908                       Diag-Err          18:57:47
<login>

  
  Express Router 9201                                                           
 
 Advanced                                                                       
  
Protocols                                                                     
                                                                                
   <IP...    >     <*> IP Routing                                                  
                                                                                
    IPX...          < > IPX Routing                                                 
                                                                                
    WAN BR...   < > WAN Bridging                                                


OK       Undo                           


설명) Protocol 화면에서 < IP... >항목을 선택한후 엔터를 치면 < >상태를 <*> 로
        설정한 후 OK 클릭.


10.IP Address설정화면

210.92.170.129   0000800E1908                       Diag-Err          18:57:47
<login>

                                                            
  Express Router 9201
  
Advanced
  Protocols   
  IP

                                                                                                  
      Links                                 
     
 LAN Link                               210.92.170.129     ^   Add...                            
      ISDN Link                              Unnumbered                                                
    
  WAN Link                              210.98.144.42          Setup...
                                                                       
                                                                                Delete  

             OK                                 
Static Routes...        Advanced...


설명) IP설정화면에서 LAN Link를 선택, Setup을 으로 들어간다.
        이
화면에서 LAN,WAN,Static Routes 까지 설정함으로 차근차근 진행합니다.
 ■ LAN IP설정화면

               IP Address             Network Mask                                     
           
210.92.170.129     255.255.255.192        할당받은 Ethernet IP블럭을 입력 
               0.0.0.0                    0.0.0.0                                          
               0.0.0.0                    0.0.0.0                                          
               0.0.0.0                    0.0.0.0                                          
                                                                                
                  OK       Undo     Default          Advanced...       


 ■ WAN IP설정 화면

WAN Link                                                     
                                                   
Link Name          : WAN Link                                  
Routing Protocol :
None/Static Route_*        라우팅 프로토콜을 선택(인터넷인 경우                                                                   Static Route 가 기본.
Triggered RIP      :                                           
Numbered          :
Yes *                 - Yes로 선택하지 않으면 아래 IP Address입력란
IP Address         :
210.98.144.42        이 보이지 않으므로 반드시 설정해야한다.
Network Mask    :
255.255.255.252   - IP와 Netmask를 입력 
                                                             
   OK       Undo     Default          Advanced...            


 ■ Static Route설정화면

Static Routes
0.0.0.0         0.0.0.0         ISDN Link                  ^   Add...    
0.0.0.0         0.0.0.0         WAN Link                                 
                                                                         
Setup...

                                                                         Delete   


Static Route 선택시 나타나는 화면으로 WAN Link선택후 Setup을 들어간다. 

 ■ Static Route 포트 지정

   Static Route
                                                                          
 Network Address : 0.0.0.0                                       
 Network Mask    : 0.0.0.0                                                
 
Link            : WAN Link                                210.98.144.42  
 Forward Address :                                                        
 Metric          : 2                                                      
                                  
 >  OK  <    Undo


 Static Route 설정화면에서 Static될 Port를 지정한후 OK선택


▲Top으로

6.한아라우터(RUSTLE4501) 설정방법      [▲Top으로]


한아라우터 외형


설정방법 및 주요 명령어

 통신에뮬레이터 환경
    9600 bps, 8 data bit, 1 stop bit, parity none.

 한아라우터 설정순서 (Encapsulation PPP기준)

1. Rustle 부팅을 확인합니다.
    Configuration setup ....
    System initialization ....
    SYNC HDLC TBD Init ...........
    SYNC HDLC3 Init ...........
    TICK Interrupt starting ....
    WAN0 Mode: test
    WAN1 Mode: test
    RUSTLE Login: router
    System restarting ........................
    Welcome to "Rustle Router-4501"
    Login O.K.(Type ? for help, Type CTL-C for interrupt.)

 주의 : booting에는 EPROM과 FLASH Booting이 있으며 Booting Message중
          
Boot from FLASH Memory.이라고 나오면 정상이고, Boot from EPROM.
          이라고 나오면 Flash Memory에 있는 System OS의
이상으로 Flash Memory
          Booting이 아니 EPROM으로 Booting한 상태. |
 
         - EPROM Booting인 상태는 사용시 문제는 없으나 최종 Version이 아닌 상태
 
           여서 기능의 제한 등 보완 된 부분의 적용을 받을 수 없다.

2. Rustle 4501에  Login 합니다.<Default Password는 router입니다.>

RUSTLE Login: router 

3. 값을 설정할 수 있는 Configuration 모드로 변경합니다.
     <Default Password는 router입니다.>

ROUTER> conf  
Enter config password : ******
ROUTER(config)>>

4. 라우터 설정

ROUTER(config)>> int e ip 200.200.200.1 255.255.255.0 1500
         
               intface_IP:200.200.200.1
                            intface_MASK:255.255.255.0
                            mtu:1500
                            intface:1

ROUTER(config)>> int w1 ip 201.200.200.2 255.255.255.252 1500                         intface_IP:201.200.200.2
                            intface_MASK:255.255.255.252
                            mtu:1500
                            intface:3

ROUTER(config)>> int w1 mode ppp       Wan1: PPP mode

ROUTER(config)>> save

ROUTER(config)>> reboot

Confirm? (y|d|n): y                     reboot시 Confirm? (y|d|n)의 의미는
                                             
     y : reboot 시작
                                             
     d : reboot시 초기화
                                                 (모든 Setting 값들을 공장 출하 초기 값으로 초기화)
                               
                   단, Ethernet IP는 초기화 되지 않습니다.
                                    
              n : reboot 취소     

ROUTER(config)>> route add 0.0.0.0 0.0.0.0 201.200.200.1 1 w1 1

ROUTER(config)>> save

ROUTER(config)>> reboot


  라우팅테이블 추가삭제 요령

※라우팅테이블 추가

ROUTER(config)>>route add <net> <mask> <gw> <metric> <interface> [mapid]
                                    - net : 목적주소
                                    - mask : netmask
                                    - gw : gateway
                                    - metric : gateway까지의 Hop count
                                    - interface : ethernet | wan0 | wan1
                                    - mapid : X.25 또는 Frame Relay 사용시 Mapping ID

   예) Net 100.100.100.1을 static route 엔트리에 추가할 경우
        ROUTER(config)>>route add 0.0.0.0 0.0.0.0 100.100.100.1 1 wan1
        ROUTER(config)>>save

                                  
 ; 라우팅 테이블의 추가 및 삭제시 save를 통해 바뀐 값 저장

※라우팅 테이블 삭제

ROUTER(config)>>
route delete <net> <mask>
  
                                         net : 목적주소
                                           mask : subnet mask


    예) Net 200.200.200.0 Mask 255.255.255.252 엔트리를 삭제할 경우
         ROUTER(config)>>route delete 200.200.200.0 255.255.255.252
         ROUTER(config)>>save


ppp Mode로 설정시 연결 확인 방법

ROUTER(config)>>sh ppp wan0 status
------------------------------------------------------------------------
   PORT :  LCP STATE     LCP OLD STATE    NCP STATE     NCP OLD STATE
------------------------------------------------------------------------
       1    :     
Opeded          Ack-sent              Opened           Ack-Sent LCP

 
설명: State가 Open상태가 되어야 IPCP(NCP)가 수행되며, LCP와 마찬가지로
         양측이 IPCP Configure Ack를 수신해야 Open상태가 된다.
         LCP와 IPCP(NCP)가 모두 Open이 되어야 실제 IP datagram 전송이 가능하다.


  기타 자세한 설정사항은 라우터 제조사인 한아시스템에서 확인할 수 있습니다.
    
한아시스템 메뉴얼보기로 바로가기


[▲Top으로]                        Copyright ⓒ eBoranet's Powered by Ethernet